

Adding Parts Manually – This is recommended for when listing 50 parts numbers or less. When listing more than 50 items we suggest using the “Bulk File Upload” option.
STEP 1: Log into Partmart and select the Parts Central link.
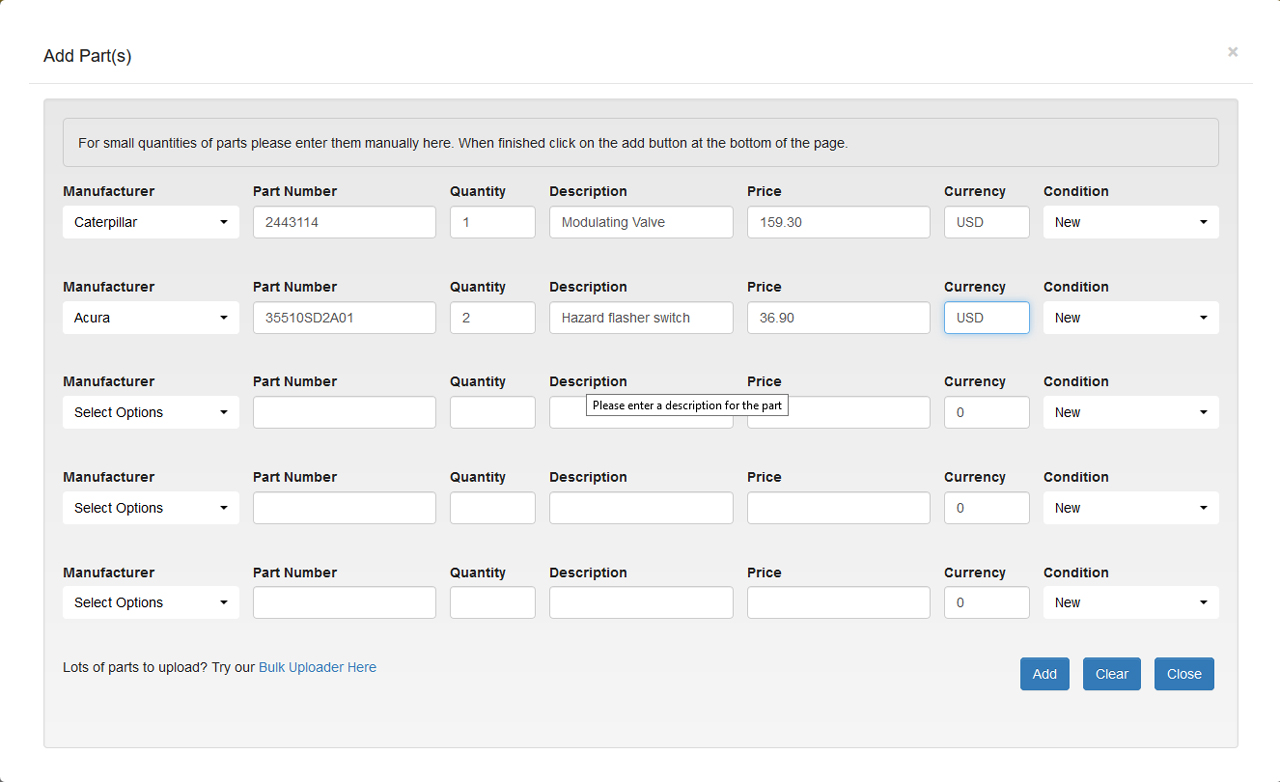
STEP 2: Click On Add Parts.
STEP 3: Select your Manufacturer – If you can’t see your Manufacturer in the list please email us and we will add it for you.
STEP 4: Type in your individual Part Numbers. Accuracy is important, so be sure to enter the part number as your manufacturer provides it to you. If you make a mistake people searching for your part may not be able to find it and you could miss out on a sale.
STEP 5: Type in your description using key words like “Piston” as customers can also search on description as well as Part numbers.
STEP 6: Your location will be set from your profile information, buyers generally have a preference to purchase from sellers closest to where they live.
STEP 7: Finally enter the selling price for your Part. Research shows that parts with prices attract 32% more buyers than Parts that only have POA (Price on Application).
STEP 8: Click on the “Add Button” located at the bottom of the page and you have now completed your upload.
You have now returned to the home page. Do a test search for one of the part numbers you just added. The search results will be shown and your company will be one of the parts listed if your upload was successful.
Regardless of the option you choose it is important to make sure your Parts File is up to date. Partmart will send out an automatic reminder to upload a new file every 60 days.
To view a video of how to upload your parts manually click here
Option 2
Bulk Upload (Automatic) this is recommended for listing 50 parts or more by (CSV) Comma separated value OR TAB delimited File upload.
Note: Microsoft Excel has a maximum row limit of 65000 lines for versions older than 2007. For versions 2007, 2010, 2013 and Office 365 the row limit for Microsoft Excel is 1,048,576 rows.
Nowadays most business point of sale software products have the functionality to first create and then export your parts file in Microsoft Excel format. Once arranged into the correct column order the Microsoft Excel spreadsheet can be easily saved as either “Tab Delimited” or Comma Separated Values (CSV) file extension.
If you only have a list of your parts in a simple Microsoft excel spreadsheet that’s fine too. All you need to do is organise your spreadsheet into the correct column order and then save as either a TAB delimited or CSV Comma Separated Value.
PLEASE NOTE# to save your file in CSV format your file must not contain any commas in any of the five columns. If you file does contain commas which are most commonly found in the description column, you must save your file as TAB delimited and not CSV. Failure to do this will cause your file to display incorrectly on Partmart, even though the file will load correctly.
To view a video of how to remove commas from your file click here
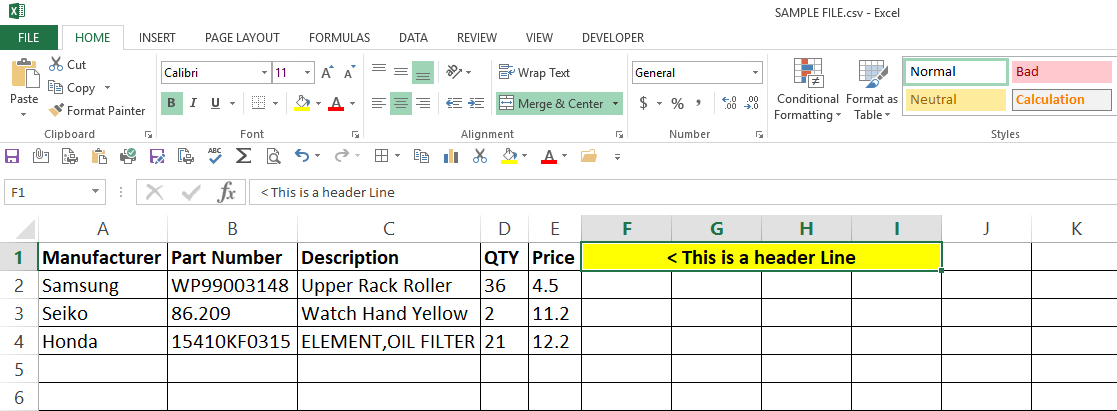
Partmart will accept either of these two common file types. For your upload to be successful it is imperative that your file is exported in the following order. Headings should be Manufacturer, Part Number, Description, QTY, Price. To view a sample file please Click Here.
To view a video of how to best use the sample file click here
You can use this sample file as a reference,or you can even ovewrite the sample data and replace it with your own.
The Bulk upload feature allows you to import a Microsoft excel spreadsheet with up to one million different part numbers on it subject to your version of excel. If you are using Microsoft Excel 2003 or earlier the maximum row limit is 65000 lines.
You are only limited by your subscription level as to how many parts that you can upload to Partmart. For more information on Subscription levels Click Here.
Some people are more computer literate than others and that’s why we have made our upload so simple. You only need to know the very basics of Microsoft Excel to compile your parts list.
The basic Microsoft Excel spreadsheet layout, comprises of just 5 columns which are shown below. Manufacturer, Part Number, Description, QTY, Price.
Manufacturer – Part Number – Description – Quantity – Price
Manufacturer: Under the manufacturer column you add the brand (Manufacturer) of the part that you are listing, for example Samsung. If you sell multiple brands that’s not a problem, for your convenience, you can load upload multiple brands in the same spreadsheet.
Part Number: In this Column you put the manufacturer’s part number exactly how you receive it from the manufacturer. If you alter it in anyway the person searching for the part may not be able to find it.
Description: In this Column you add the description of the part for example “Upper Rack Roller”. Searchers can search not only by part number, but descriptions also.
Quantity: This is self-explanatory. Simply add the quantity of the parts that you have available for sale, for example if you have 36 of them in stock, enter 36.
Price: Price is extremely important. Our research shows that parts with a listed price have a 32% higher rate of being inquired on, versus parts that have no pricing at all. Prices are set by you, however you are free to negotiate with the buyer if you wish to do so.
To view a video of how to create your parts file for upload click here
Please Note # You can include multiple Manufacturers in a single parts file as shown below.
To view a video of how to bulk upload your parts click here
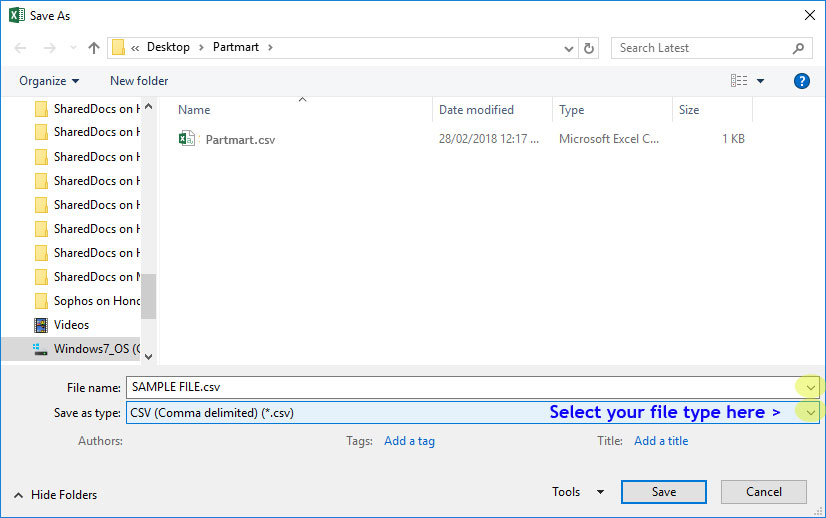
Saving your file in the correct format
From the drop down "save as type" menu, select either CSV Comma delimited or Text TAB delimited then simply save the file to your preferred directory or location where the file is easy to find.
STEP 1: Log into Partmart and select the Parts Central link.
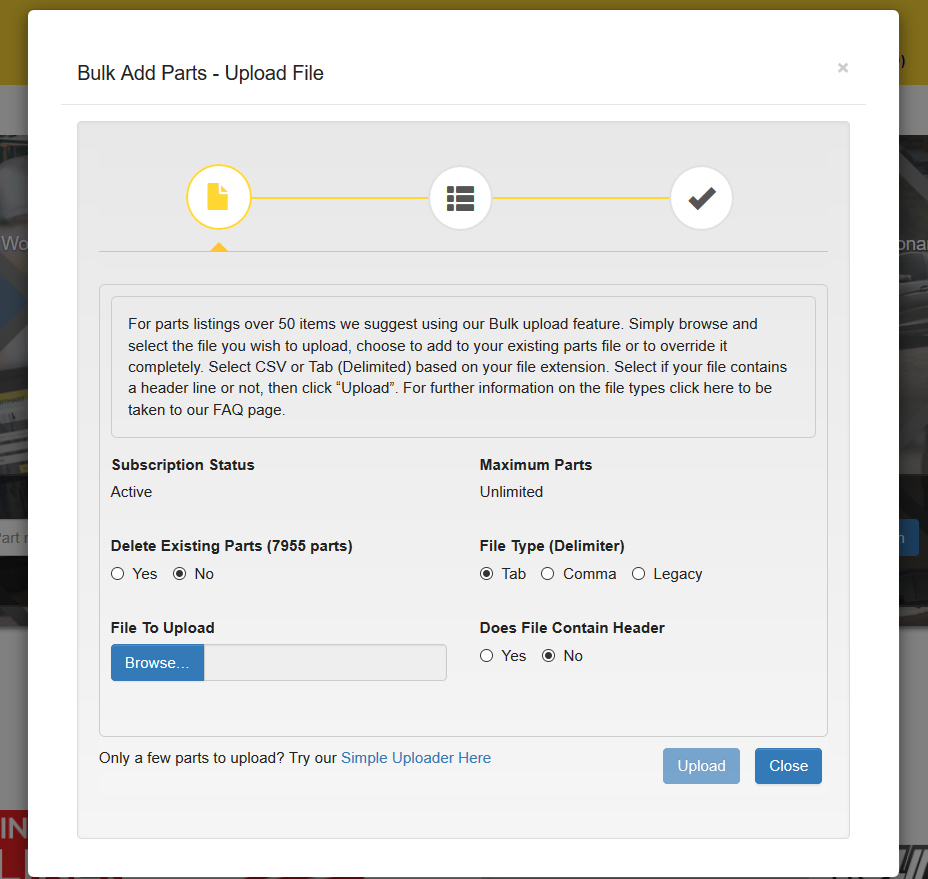
STEP 2: From the drop down menu Click On Bulk Add Parts.
STEP 3: Choose whether to add to your existing parts file or to override it completely. For new users the site automatically defaults to “No” so you do not need to make a selection.
STEP 4: Simply browse and select the file you wish to upload. If you have multiple brands to upload all parts can be uploaded in one simple spreadsheet.
STEP 5: Select CSV or Tab (Delimited) based on your file extension. The Legacy option is for previous Partmart customers only.
STEP 6: Select if your file contains a header line or not, then click “Upload”.
STEP 7: Partmart will then display the first two rows of your file so you can confirm if the upload is in the correct format. If there are errors the incorrect fields will show in Red if the file is correct it will show in Green.
STEP 8: If your file headings match with the headings shown simply click on the “Complete button to complete the upload function”
STEP 9: Now click on the Home Page link and do a test search for one of the part numbers that you just added. The search results will be shown and your company will be one of the companies listed for that part.
Note: It’s important to make sure your Parts File is always kept up to date. Partmart will send out an automatic reminder to upload a new file every 60 days.
Keeping your parts file updated is important to your success on Partmart. Most sellers are businesses, and they sell parts day to day in their stores. Whilst there stock is generally controlled by their computer systems, once sold these items are not being deleted off Partmart.
You can upload a new parts file as often as you like, it’s included in your subscription. Partmart will contact our Business and Premium business subscribers just to remind you that it’s time to update your file. Our research shows that once a buyer deals with a seller, they often purchase other parts from the seller.
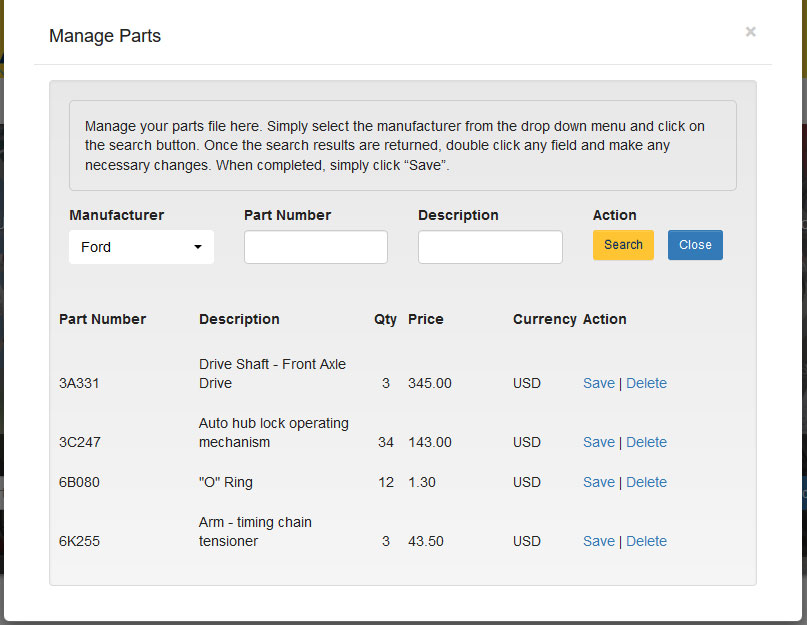
You can modify your parts file at any time. If you wish to delete sold parts, change prices, currency and quantities, it’s all done here. Once logged into Partmart, head to the menu and select “Parts Central” from the drop down menu select “Manage Parts”.
Once you are in the Manage Parts page, simply select your manufacturer and click the search button. Partmart will list your entire file for the selected manufacturer. If you have multiple manufacturers in your file your will need to select them and make your modifications one manufacturer at a time.
Once on page simply click on the field that you want to change and make the required changes. Once the change has been made click on the save button and the information will be updated instantly.
Uploading parts to Partmart is easy. If your computer skills are not strong, don’t panic!
We have simplified the upload process. If you have followed the correct header format in your excel spreadsheet of Manufacturer, Part Number, Description, Quantity and Price, your half way there.
Simply make sure that you have saved the file in the correct CSV (Comma Separated Value) or Tab Delimited file type and you’re good to go.
We are here to help. If you think you have done everything correctly and the file will not upload properly then let us know. Send us a message at help@partmart.com. We will take a look at the file and let you know what you need to change.
To view all help video's related to uploading your file click here